


Above: Michael (left), blinded by Ed's showing-off his guns as he sets up the filmed table. (Or maybe, its down to the amazingly strong LED lamps).

Above: I was very pleased with the finished desert table. No office blocks to be seen. And to answer your question, the rock spires just block line of sight and infantry cannot occupy them.

Above: Dan's briefing. Competitors hanging off his every word.
Stephen and I had the only two Resistance armies in the 20 man field, and mine was the only Feral Resistance. As already been mentioned by bigger and better blog reports, nine players took UCM. My army was as follows:
- HQ: Thunderstorm (level 2), 3 Thunderwagons,
- Vehicle Detachment: Kraken, 3 Gun Wagons,
- Vehicle Detachment: Kraken, 3 Gun Wagons,
- Infantry: Kraken, 2 Battle Busses (with Rockets), 4 Resistance Fighters (2 units of two),
- Infiltrators: Special Lifthawk, 4 Bezerkers (2 units of two), 2 Freeriders.
Game One: Rob - UCM - Bunker Assault
I should have done better at this game. Rob had three troop choices, to my five, but I risked one unit of Berzerkers to get to his bunker, which died when Rob brought down the Lifthawk. And through poor placement my other troop units only secured two of the five bunkers. The Thunderstorm didn't see the end of the game, and without its points the central objective fell to Rob, who played well throughout.
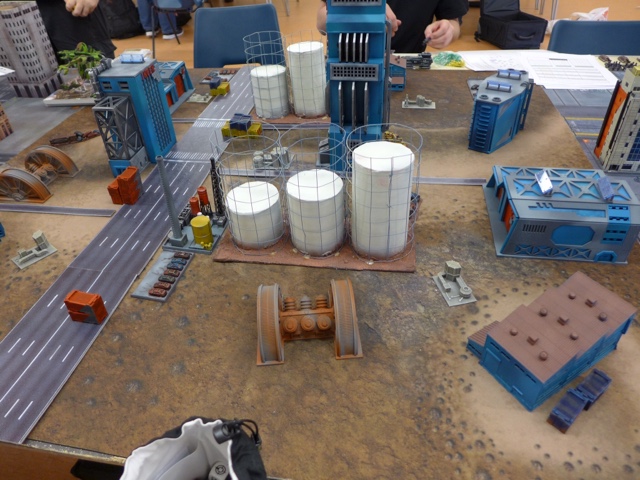
Above: My table for game one; Ed's very pretty industrial table.

Above: The table at turn six. The Thunderstorm obvious by its absence.
Game Two: Scott J. - Scourge - Civilian Extraction
I was a bit low after game One. Which may have explained the epic mistake I made at the beginning of the next game. By not appreciating the table layout, I didn't take into account that on one side of the table had obvious trees and piece of scatter terrain hindering the approach to the middle focal point (scoring from turn two onwards). My big models just couldn't get to where they needed to be.
I brought down one of the buildings containing survivors, including six bases of Scott's Warriors. The other building contained the Scourge Destroyers and my Bezerkers and Freeriders. That epic battle finally ended at the end of turn five, but unfortunately the time ran out, and my bases didn't get a chance to search.

Above: Scott views the loss of the building, and more importantly, a considerable proportion of his troops.

Above: How I wished to be on the other side of the table. A piece of very resilient scatter terrain (A crashed UCM Drop Pod) refused to budge.
Only two survivors were found in the entire game, by the Destroyers, but they were lost when the big creatures lost the combat. The focal point points pointedly gave the win to Scott.

Above: Enemy dead, but time ran out.

Above: Next came lunch, and a chance to recharge. The lull before the storm, as we enjoyed our pizzas.

Above: A picture for all you techno-geeks, the camera set up covering the activities on table one.

Above: (Left) Mike calls out the pairings for round three. Hawk Louis standing legs apart, hands on hips, like a modern day superhero, ready to take on all-comers.
Game Three: Rob - UCM - Forward Air Base
Despite the poor showing in the morning, with still two games to go, I had a chance to turn things around in the afternoon. Unfortunately, for Rob, the dice gods decided that the Resistance were going to be blessed in this game. But this was no Scourge rapier strike, it was more akin to being bludgeoned by a fence post. The Thunderstorm and Thunder Wagons reaped a bitter harvest on UCM tanks, and during combats, I was struggling to find enough dice for the Berzerkers (70 combat dice out of a possible 80 was scary as hell). The dust settled and a good win was the result.

Above: I guess I must have been focused on the game, this was the only photograph I took, at the very start of turn one as units were coming on to the table.
Game Four: Bryan - UCM - Military Complex (WMD).
This was by far the most eventful game during the entire day (you can read Bryan's version of events at: http://varchildesvault.blogspot.co.uk/2017/07/dropzone-commander-from-boot-camp-to.html ).
Two particular moments stick in my mind from this game. Firstly, on the last activation of a turn, I put four stands of troops into a building holding an objective, but with only 1DP left on it. I won the initiative for the next turn, but Bryan played a Quick Thinking Command Card, before I could take a sneaky search, and the Fighters paid the ultimate sacrifice for their bravery.
And secondly, when a unit of Bryan's infantry, decided to search for the WMD in central building. He knew that they were likely to die in the following combat, but he held the Heroic Sacrifice Command Card, so he knew that one of the unit's stands could escape whilst the other fought on to the bitter end. But Bryan's hopes were dashed when, on finding the WMD, I played Improvised Trap, killing the already injured stand who found the objective. Bryan's remaining stand was now held in place by the combat, and the Resistance secured the objective after a very one-sided fight.

Above: One point of damaged left on the building. What could possibly go wrong if I went inside?

Above: Left, central building. Hazard Suits and Bezerkers battle it out. Right, the endless stream of Drones interfere with my plans.

Above: The Drones make a last desperate attempt to stop the Kraken handing off the WMD to the Thunderstorm, who waits in anticipation to deliver a three point bombshell.
I secured the win, and my two victories jumped me up the roster, to ninth, and gave me the satisfaction at a top ten finish.
My Resistance comrade, Stephen, did a very difficult thing, he retained his Critical Engagement title, taking home the overall trophy for a second time.

Above: Smiles all round. A picture, of Hawk Liam taking a picture, of OB Joe, taking a picture, of OB Ed, collecting his best painted award.

Above: And the winner is......
And before too long we were crating up terrain and folding tables. Many thanks are required at this point: The rest of the OB crew, especially Dan, for TO'ing, and Mike for assisting as 'odd man', Ed for terrain building and being Techboy 2000, and Joe for.........er..........wait a minute............I know there's something.......got it, he bought the donuts.
And finally thanks go out to all my opponents and all the other competitors.
As always enjoy your gaming.
Alex
Great post and thanks for the great game Alex. I hate Resistance.
ReplyDeleteThank you Bry. You are very kind. Conversely, I love my Resistance, although I hate UCM Drones.
DeleteGreat writeup, Alex! Glad you got your focus back after pizza. Congratulations on a Top 10 finish!
ReplyDeleteThank you JW. It was good to see everyone enjoying the different approach to the stardard tournament.
DeleteLooks like it was a great day. Shame I missed it. Especially as I'd really have loved to have played a few games on nicer / different terrain.
ReplyDeleteI have just discovered I can make it to Autumn Invasion however, so looking forward to that!
Excellent stuff AD. Looking forward to catching up in the Autumn.
Delete